With the Mapillary ArcGIS Pro add-in, you can access Mapillary street-level imagery and data directly from ArcGIS Pro. The Mapillary add-in makes editing feature classes, updating attribution, and validating the existence of assets based on street-level imagery easy.
Ready to get started? We’ll walk you through everything you need to know to be successful with the add-in.
📖Table of Contents
-
- Compatibility requirements
- Downloading the add-in
- Activating the add-in
-
Learning the basics
- Filtering imagery
- Viewing imagery
-
Digitizing with imagery
-
Advanced features
- Time travel
✅Compatibility Requirements
In order to use Mapillary for ArcGIS Pro, please ensure you meet the system requirements of ArcGIS Pro 3.0 or higher. The Mapillary ArcGIS add-in is compatible with all 3.x versions of Pro.
For best performance, we recommend using a device with at least 32GB of RAM & a dedicated GPU ideally with 16+ GB of memory.
📥Downloading the add-in
Mapillary is available in ArcGIS Pro as an add-in.
An ArcGIS Pro add-in is packaged as a single compressed file with the .esriAddInX extension. This is a simple file type that can be sent by email, downloaded from a portal, or exchanged in the same ways as other ordinary files. To read more about managing ArcGIS Pro add-ins, see Esri’s documentation.
Once you have the add-in installed (ideally in a folder where you store other add-in or ArcGIS Pro supporting files), go ahead and open up ArcGIS Pro.
💡Activating the add-in
Now that you've downloaded the add-in, open up ArcGIS Pro.
If on the ArcGIS Pro home screen, click on 'Settings' on the far left side, then 'Add-in Manager.'
If ArcGIS opened directly to a project file, click on the 'Project' tab and then on 'Add-in Manager.'
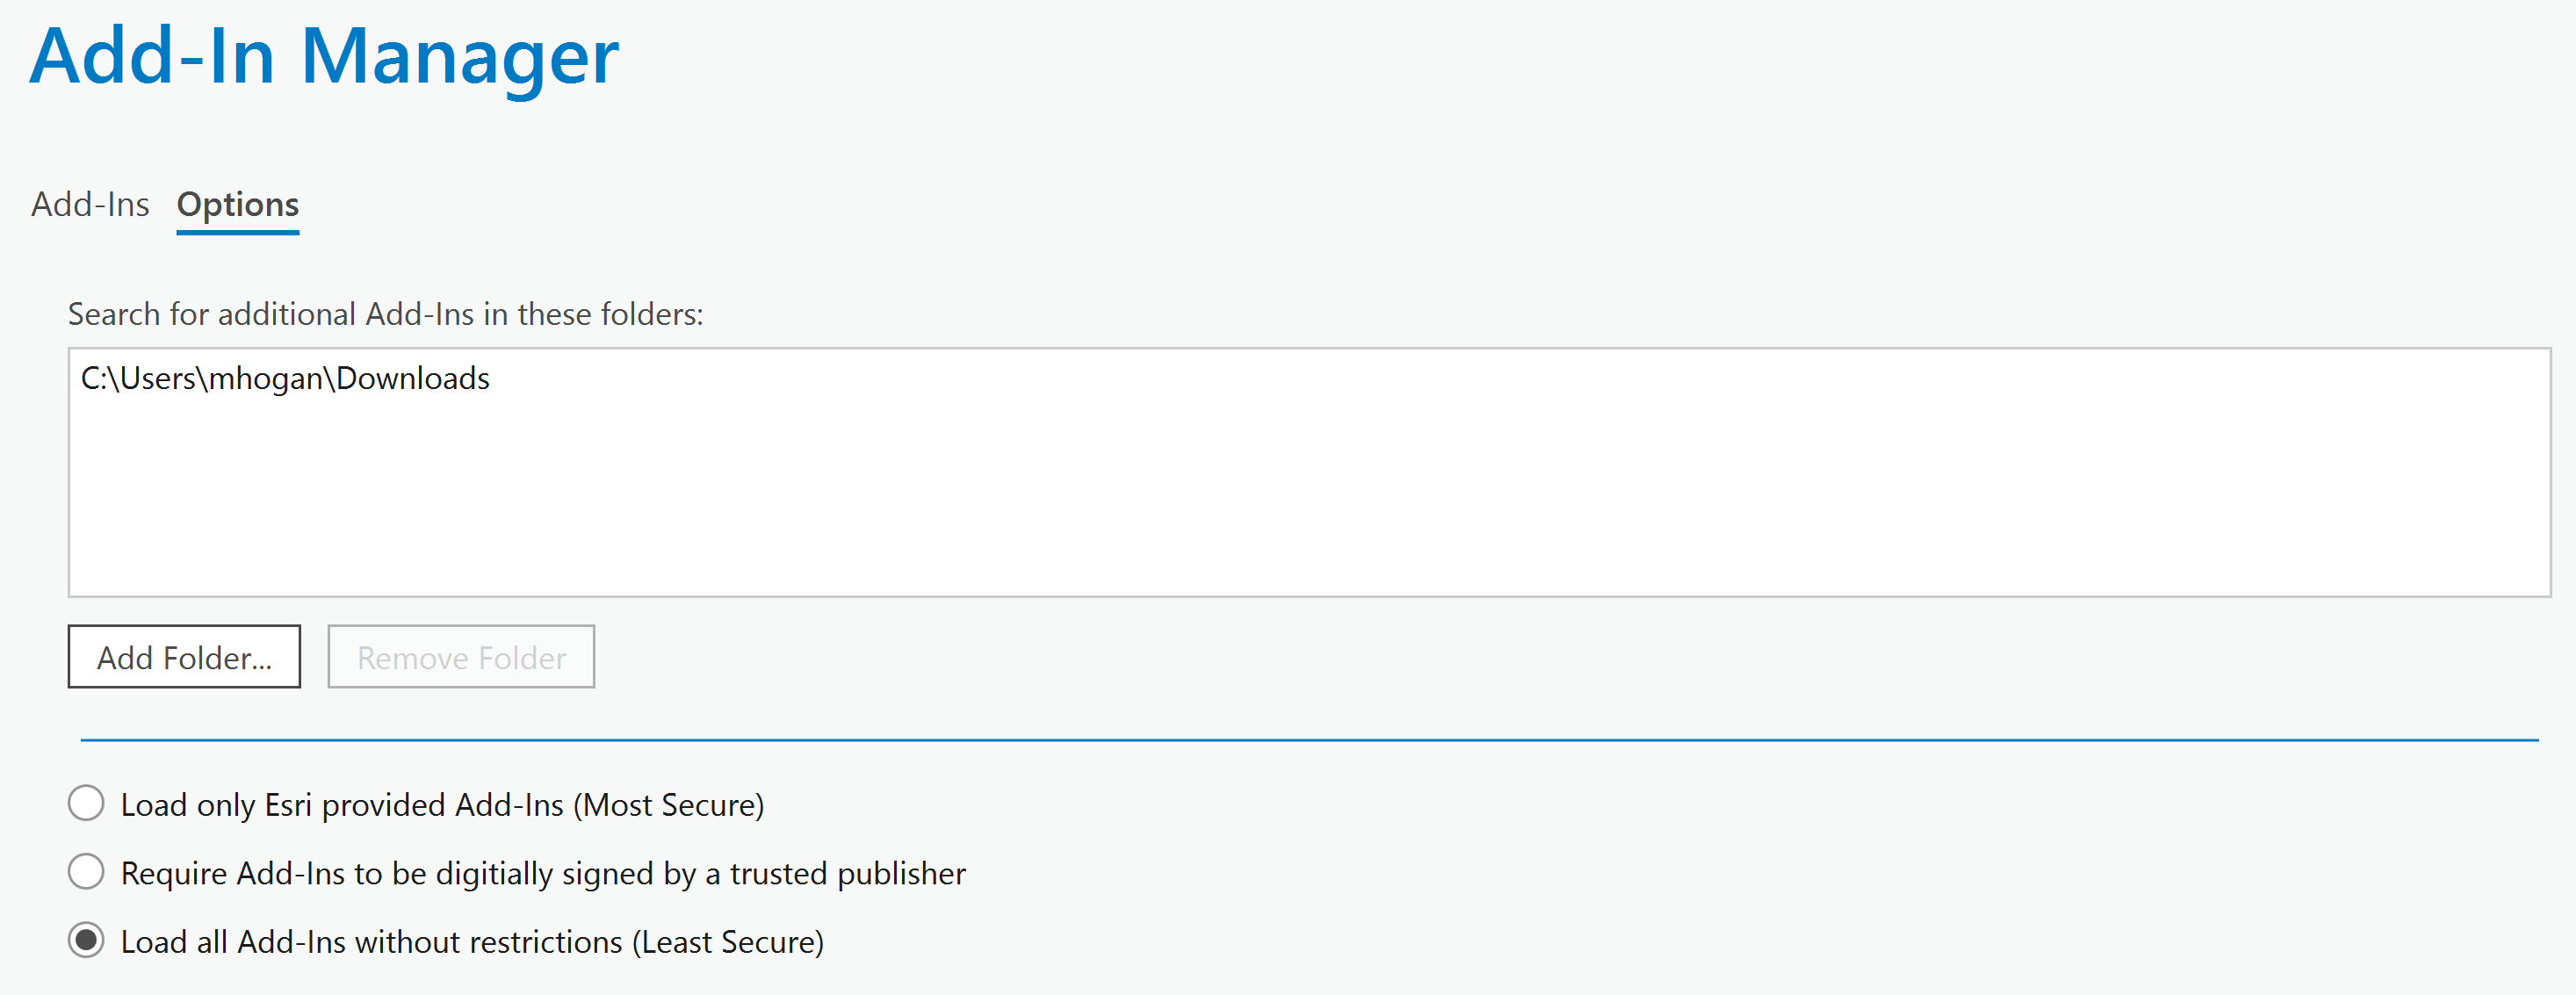
Depending on your existing configurations, you may already see the Mapillary add-in in your 'My Add-Ins' section. If not, please click on the 'Options' tab.
We'll need to add a link to the folder where you saved the add-in. Click on 'Add Folder...' and select the folder you saved the .esriAddInX file to. The folder path will populate in the text box, like below.
Make sure you have selected 'Load all Add-ins without restrictions' as well.
After linking the folder, you'll need to close our ArcGIS Pro and reopen it for the Mapillary add-in to successfully take effect. Once you do so, you should see the following in the Add-in manager:
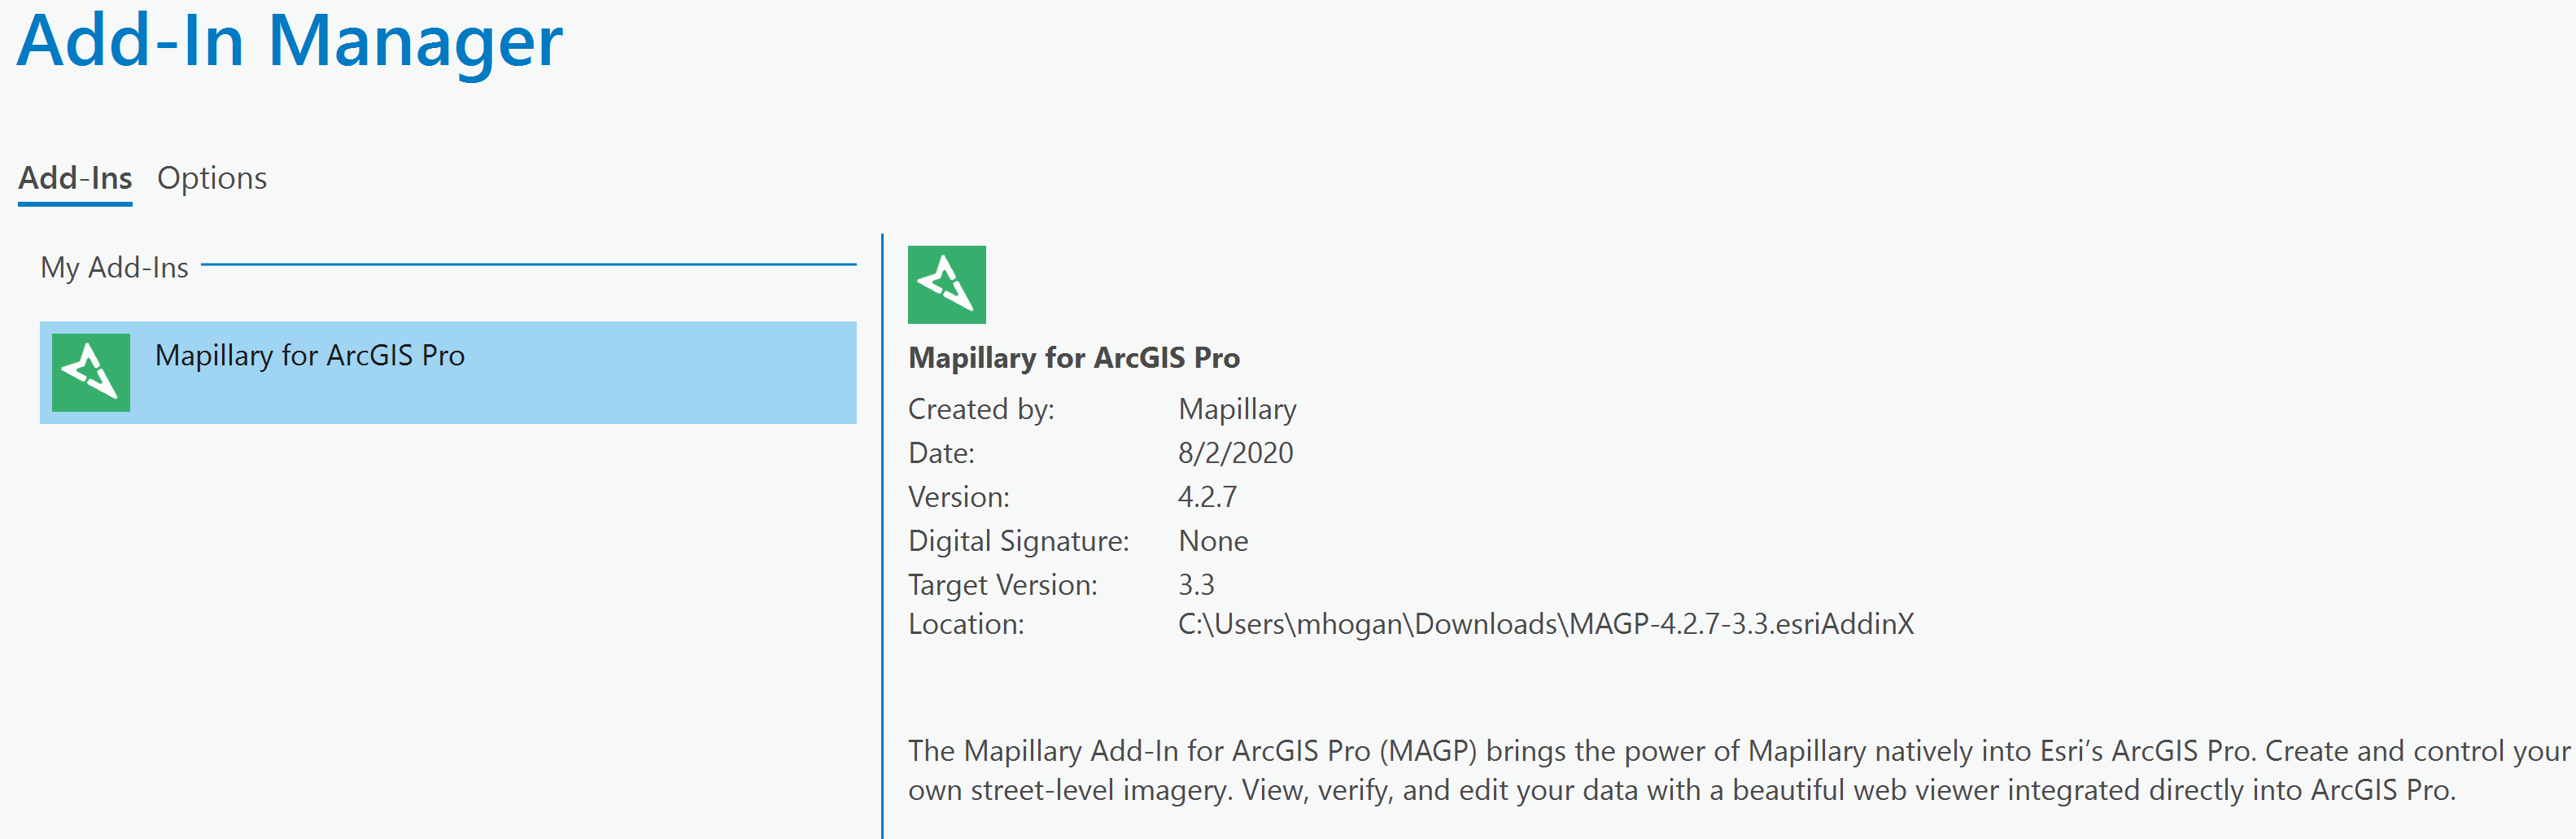
If you see the above, congratulations, you're ready to start using the Mapillary ArcGIS Pro add-in!
✏️Learning the basics
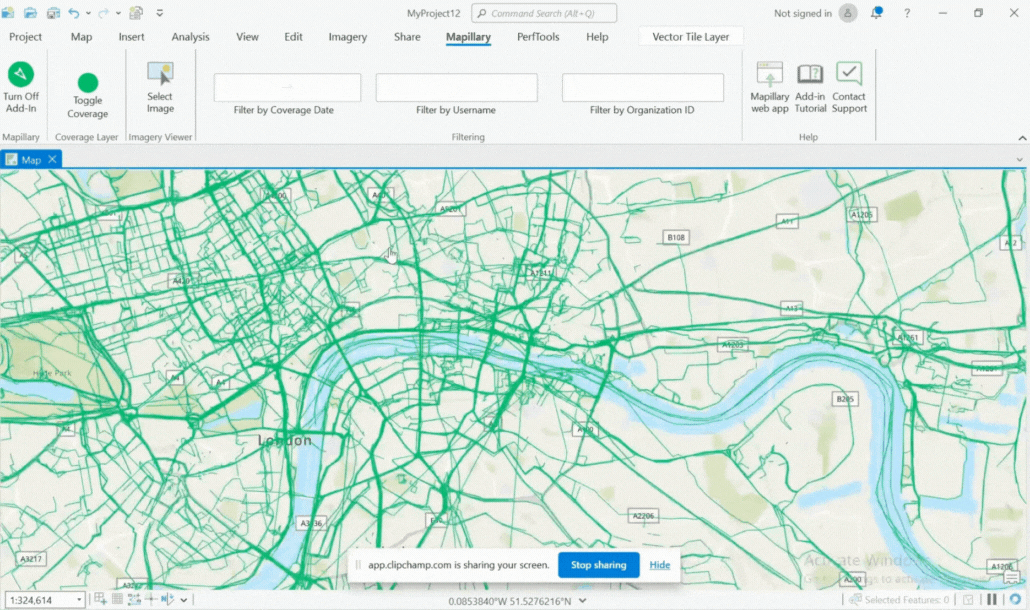
The Mapillary add-in is accessed through the main ribbon at the top of your project file. Click on the 'Mapillary' tab to open up the Mapillary add-in toolbar.
We'll now go through each button one-by-one.
Turn On/Off Add-In: This button is used to turn on or off the add-in. When not using the add-in, it's best to keep it turned off, so that you do not experience any slowdown.
Toggle Coverage: This button allows you to turn on or off the Mapillary coverage tile layer. This is a good button to use if you need to quickly peek at a different layer beneath Mapillary coverage.
Select Image: You can think of this tool similar to the 'Select' tool on ArcGIS Pro, except that the Select Image function, when enabled, turns your cursor into a selector that allows you to click ONLY on Mapillary images. While enabled, you can use the arrow keys on your keyboard to move around on the map—if you'd like to use your cursor to explore the map, you'll need to toggle off the image selector. More on viewing imagery below!
Filter by...: you can apply a date filter, username filter, or organization filter to drill-down on the imagery you care about. More on filtering below.
Mapillary web app: This is a quick link to the Mapillary web app. This is helpful if you want to quickly verify the status of your recent uploads, go delete an image, etc.
Add-in Tutorial: a quick link to this very page!
Contact Support: a link to submit a ticket to our Help Center. We're happy to answer any questions you may have/assist in any technical issues related to the add-in!
🎞️Filtering Imagery
For the most efficient workflow, we suggest starting with applying a filter to the Mapillary coverage layer. In most cases, you are likely only interested with a given time range, your own captures, or your organization's captures.
To apply a date filter, select a date range with the 'Filter by Coverage' date filter. You can specify a beginning date, both a beginning and end date, or just an end date.
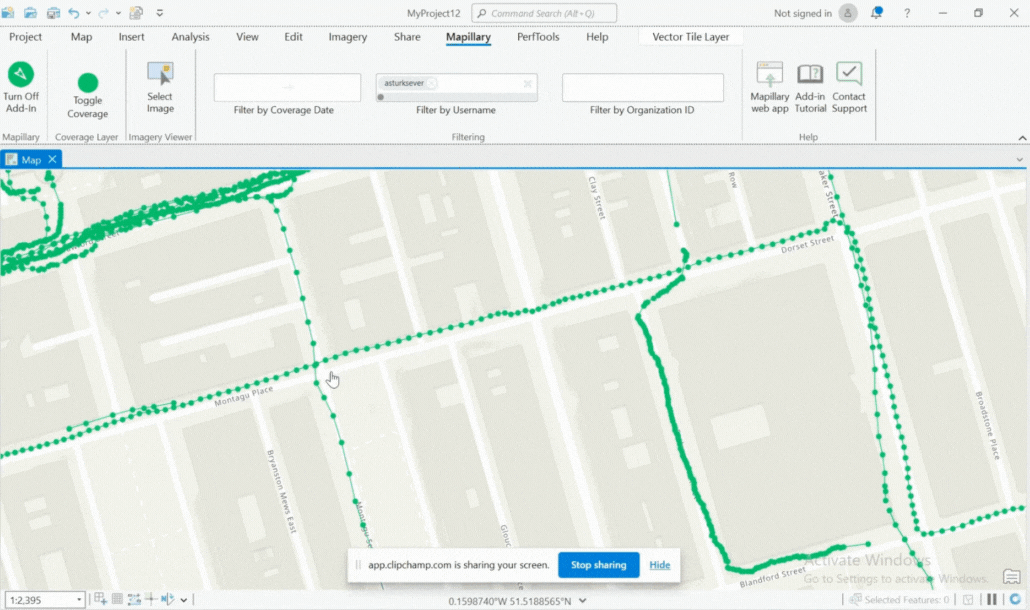
To apply a username filter, simply type your username into the 'Filter by Username' box. Click your 'Enter' key on your device to apply the filter.
To filter by organization, you'll need to grab your organization key. This can be found by going to the 'Profile' section of your organization account on our web app. Copy and paste that into the organization filter box and then click 'Enter.'
😎Viewing imagery
Once you've set any filters you'd like, now it's time to start viewing your imagery.
You can select an image to view by clicking Select Image. While this button is toggled on, your cursor will become a crosshair with which you can click a specific image (marked by green dots) on the map.
Upon clicking on an image icon, a Mapillary Imagery Viewer will open and the image will display. You can adjust the size of this pane and undock it to position it as you'd like.
You can click and drag with your cursor to move around in the image. If you'd like to zoom in or out on the image, use your mouse scroll or the +/- arrows in the Imagery Viewer.
On the map, you’ll notice that the capture to which the selected image belongs now appears in blue. You can use the playback arrows on the top of the Imagery Viewer to move through this capture from start to finish.
If you click on the "|" icon, you'll access some advanced imagery movement tools—the bunny icon allows you to control the speed at which you move through the capture (when the 'Play' button is pressed) and the slider icon allows you to quickly move to the first (far left side) or last (far right side) images in the selected capture.
You can also navigate to other photos nearby that aren’t part of the selected capture by using the spatial arrows at the bottom of the Imagery Viewer. Alternatively, you can simply click on a different image icon in a nearby capture to open up a different set of images.
📍Digitizing with imagery
Mapillary for ArcGIS Pro enables you to not only view images in an area of interest to you, but also compare the scenes in your images to point feature classes.
Most importantly, you can digitize directly within the Imagery Viewer to add new points or move existing points within your feature class!
Selecting a feature class to digitize
You likely have some specific data you're interested in—is it stop signs, accessibility ramps, manholes, park benches, or something else?
In any case, you’ll need a
This can be a feature class that already contains points, such as a third party dataset or a preexisting dataset you maintain, or an empty feature class that you've just created.
Viewing your point data within the Imagery Viewer
Once you've decided which feature class you'd like to work with, the next step is to add it into the Imagery Viewer so that you can view it's points within Mapillary images.
To do so, you'll need to toggle on the placement tools by clicking the marker icon at the top left of the image viewing pane.
Next, you will need to select your desired feature class using the drop-down at the top center of the image viewing pane.
Once you've selected your layer, you will now see your feature class point markers in their approximate location within your Mapillary image.
The marker location in the image can vary according to the accuracy of the GPS that was used with the user’s camera. For example, a marker on a street corner in the image may correspond to a point feature that is offset from the street corner on a map, considering the GPS may not have the precision to the centimeter level.
To get a view of specific points, use the Select Image tool to choose an image near your point data. You’ll see the camera angle of the chosen image and can navigate around to ensure it points directly at your feature to get a view of the marker in the image viewing pane. Remember that you can navigate through the chosen sequence, highlighted in blue, which will ensure you maintain the same perspective. You can also use the spatial navigation to move to other nearby images that may offer a different angle.
Editing existing data
With the placement tools enabled, you can move the locations of existing point features. Click and hold on the point to begin moving it, and drag it to change its location.
You can also click and drag the point on the map while using the ArcGIS Pro edit tab, and its change in position will be reflected in the image viewing pane. Remember to toggle off the Select Image tool before attempting to move features on the map, so the viewing tools don’t interfere with your editing.
If you move the point up and down, it will adjust its depth closer or further away, while left and right adjusts horizontal position. The altitude, or z-index, of the point cannot be adjusted as all points are assumed to be at ground level. This does not prevent your point data from still having an altitude attribute, but simply means it isn’t reflected in the Mapillary image viewing pane.
Creating new data
To add a point to your selected feature layer, use the green shadow on the ground as a reference and simply click on the image. A new marker will appear. You can then click and drag this marker as needed to improve its placement.
Alternatively, you can add a new point feature by using the ArcGIS Pro edit toolbar and adding it to the map, and it will appear in the image if the image is looking at the point location.
Deleting point features
To delete a point feature, you will need to use the ArcGIS Pro editing toolbar. You can select the feature to delete by either clicking the point feature on the map and then clicking Delete in the editing toolbar, or by clicking the circle inside the marker in the image, then again clicking the Delete button in the ArcGIS Pro editing toolbar.
Saving your edits
After adding new features, moving the position of your features, or deleting features, be sure to click Save in the ArcGIS Pro editing toolbar.
🔎Advanced features
Currently, we offer one 'advanced' feature on the Mapillary add-in. If you have ideas for how we can make the add-in more useful for your workflows, please shoot us a message!
⏰Time Travel
The Mapillary add-in also allows you to use the Mapillary Time Travel tool within ArcGIS Pro directly.
You can use this tool to detect if a selected image has counterpart images from another user and/or another date in approximately the same position and showing the same scene. To activate this tool, click the clock icon next to the placement tools icon.
You will see a drop-down box appear at the top center of the image viewing pane. This box will indicate the date of the current image. If time travel is available between your current image and others, the drop-down box will show the dates of similar images:
When you’ve selected an alternative image to compare, a slider will appear at the bottom of the image. Drag this slider from right to left to pan between the two images, or select a different image from the drop-down box to do the same:
While the images most often won’t line up exactly, they will match the same scene and give you an idea of the landscape changes over time. This can be useful for adding point features that indicate changes in the landscape or infrastructure.
This tool relies on your exploration of existing imagery to find comparisons, so try it in many locations while using the Mapillary coverage tiles as a reference for where overlapping images may exist.